Demo Part 2
Step 9 Dynamic data in Templates with ORM
relevant git branch
orm
a. Get Dynamic data (cupcakes) from database using queryset. Add following code in menu/views.py in cupcake_list function.
from django.shortcuts import render
from .models import Cupcake

def cupcake_list(request):
    cakes = Cupcake.objects.all().order_by('-createdAt')
    context = {"cakes": cakes}
    return render(request,"menu/list.html",context)
Above query Cupcake.objects.all().order_by('-createdAt') will fetch all the cupcakes from the database in descending order with respect to createdAt.
That code loads the template called menu/list.html and passes it a context. The
contextis a dictionary mapping template variable names to Python objects.
If we visit the home page, we cannot see the data from database in template. Time to go back to our template and display this QuerySet!
b. We will use Django Template Tags to add data from our queryset to template. We will remove the hard-coded cupcakes and replace it with following.
list.html
{% extends 'menu/base.html' %}
{% load staticfiles %}
{% block content %}
<div class="container">
<!-- Main component for a primary marketing message or call to action -->
<div class="jumbotron title text-center" style="background-image: url({% static 'menu/images/cupcake_cover.jpg' %});">
<h1 class="title">Cupcakes and High Fives!</h1>
<p>Django Girls Seoul welcomes you!</p>
<p>Lets build an awesome Django site together</p>
<p>
<a class="btn btn-lg btn-primary" href="https://github.com/DjangoGirlsSeoul/djangocupcakeshop" role="button">Source Code »</a>
</p>
</div>
</div> <!-- /container -->
<div class="container">
{% if cakes %}
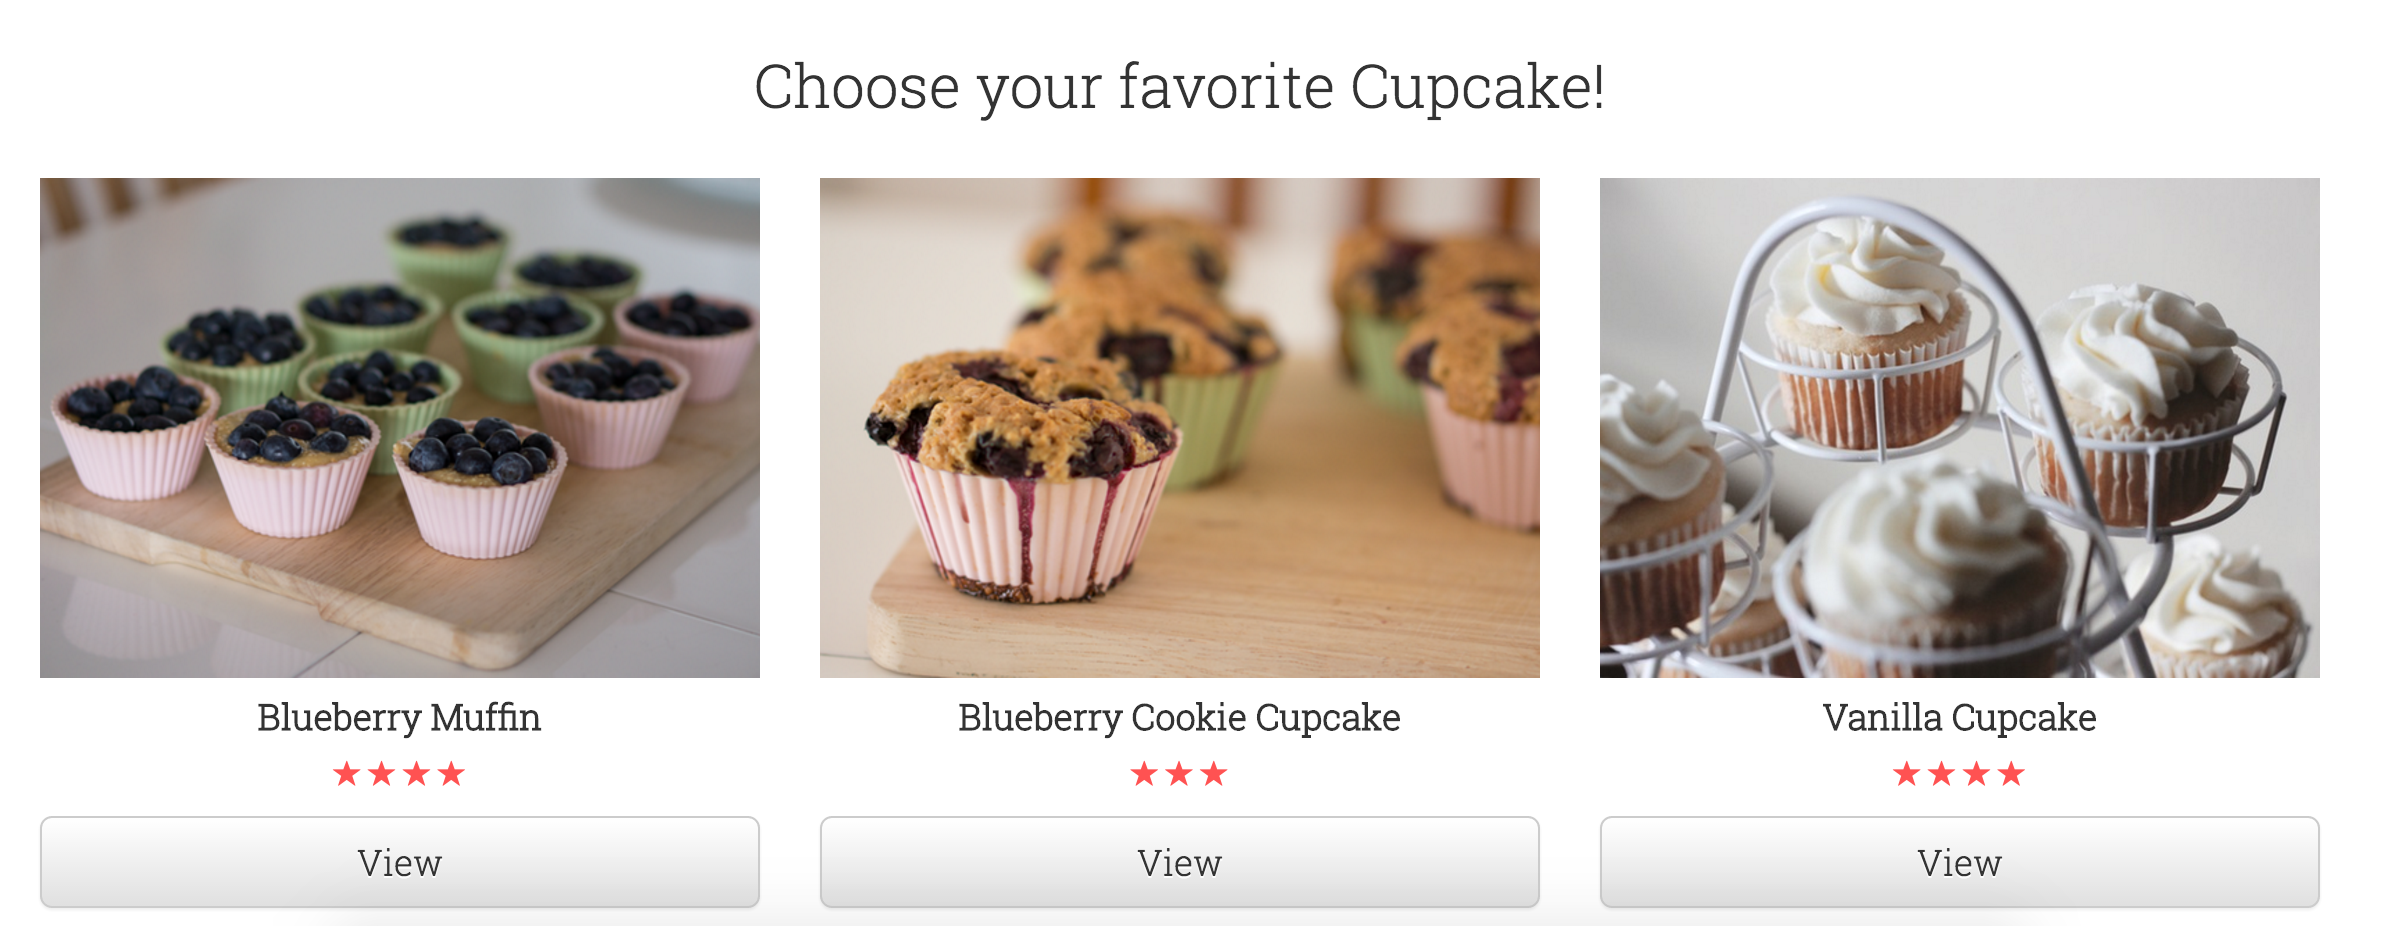
<h2 class="text-center">Choose your favorite Cupcake!</h2>
<div class="row">
{% for cake in cakes %}
<div class="col-xs-12 col-sm-6 col-md-4 col-lg-4">
<div class="card">
<div class="card-img-top">
<div class="image" style="background-image: url({{ cake.image.url }});"></div>
</div>
<div class="card-block">
<h4 class="card-title text-center">{{ cake.name }}</h4>
<p class="card-text text-center">
<span class="glyphicon glyphicon-star" aria-hidden="true"></span>
</p>
<a href="#" class="btn btn-default btn-lg btn-block">View</a>
</div>
</div>
</div>
{% endfor %}
</div>
{% else %}
<h2 class="text-center">No Cupcakes added yet -:(</h2>
{% endif %}
</div>
{% endblock %}
Start development server again and visit home page to see the cupcakes from your database appear in template :)
c. We have one problem that we have to address here. As you can see that only one star appears for rating. Django Template doesn't allow usage of complex Python functions in template such as range. We have to make a custom Django Template filter for looping over rating count and add number of stars based on it. We are going to create a custom Django Template Filter. You can read more about it here.
For this purpose, we will create a templatetags directory in the same folder with models.py and 'views.py'. Don't forget to add __init__.py empty file in it. Create a file menu_extras.py in templatetags folder.
Following should be your directory structure.
menu/
    __init__.py
    models.py
    templatetags/
        __init__.py
        menu_extras.py
    views.py
Add following contents to menu_extras.py
from django import template

register = template.Library()

@register.filter
def get_range(value):
    """
     Filter - returns a list containing range made from given value
     Usage (in template):
    """
    return range(int(value))
and in your template list.html, add following after {% load staticfiles %}
{% load menu_extras %}
One last thing left is to add a for loop using our new custom filter. Replace existing rating html with following.
list.html
<p class="card-text text-center">
   {% for i in cake.rating|get_range %}
    <span class="glyphicon glyphicon-star" aria-hidden="true"></span>
   {% endfor %}
</p>
Start development server again and visit home page to see the cupcakes from your database appear in template :)
Step 10 Extend your Application
Relevant branch
extend-app
a. Until now we have properly configured the list.html template. You can see posts added from admin on homepage. Good job! Now we want user to see more details about a Cupcake once they click the View Button. We will go back to the basics and repeat the steps we did for configuring list.html template.
First of all, we will add a new url which will point to a single cupcake. Add the following code to menu/urls.py file below url(r'^$',views.cupcake_list,name="cupcake_list"),
url(r'^cupcake/(?P<pk>\d+)/$',views.cupcake_detail,name="cupcake_detail")
This part ^cupcake/(?P<pk>\d+)/$ looks scary, but no worries - You can read explanation about it here [Eng, Kor].
Then add a function cupcake_detail in menu/views.py to render the template we created earlier. Any url like cupcake/1 will be sent to view function cupcake_detail.
from django.shortcuts import render, get_object_or_404

def cupcake_detail(request,pk):
    cake = get_object_or_404(Cupcake,pk=pk)
    context = {"cake": cake}
    return render(request,"menu/detail.html",context)
b. There are two more things we have to do before we can see the cupcake detail page. Firstly, add a link to list.html template which can take us to detail page. Replace existing <a href="#"... with following code.
<a href="{% url 'menu:cupcake_detail' pk=cake.pk %}" class="btn btn-default btn-lg btn-block">View</a>
The mysterious {% url 'menu:cupcake_detail' pk=cake.pk %} will take us to the view function cupcake_detail which in turn will show us the detail page!
Secondly, we are going to add template tags and custom filter in detail.html for showing the cupcake from database.
{% extends 'menu/base.html' %}
{% load staticfiles %}
{% load menu_extras %}
{% block content %}
<div class="container">
{% if cake %}
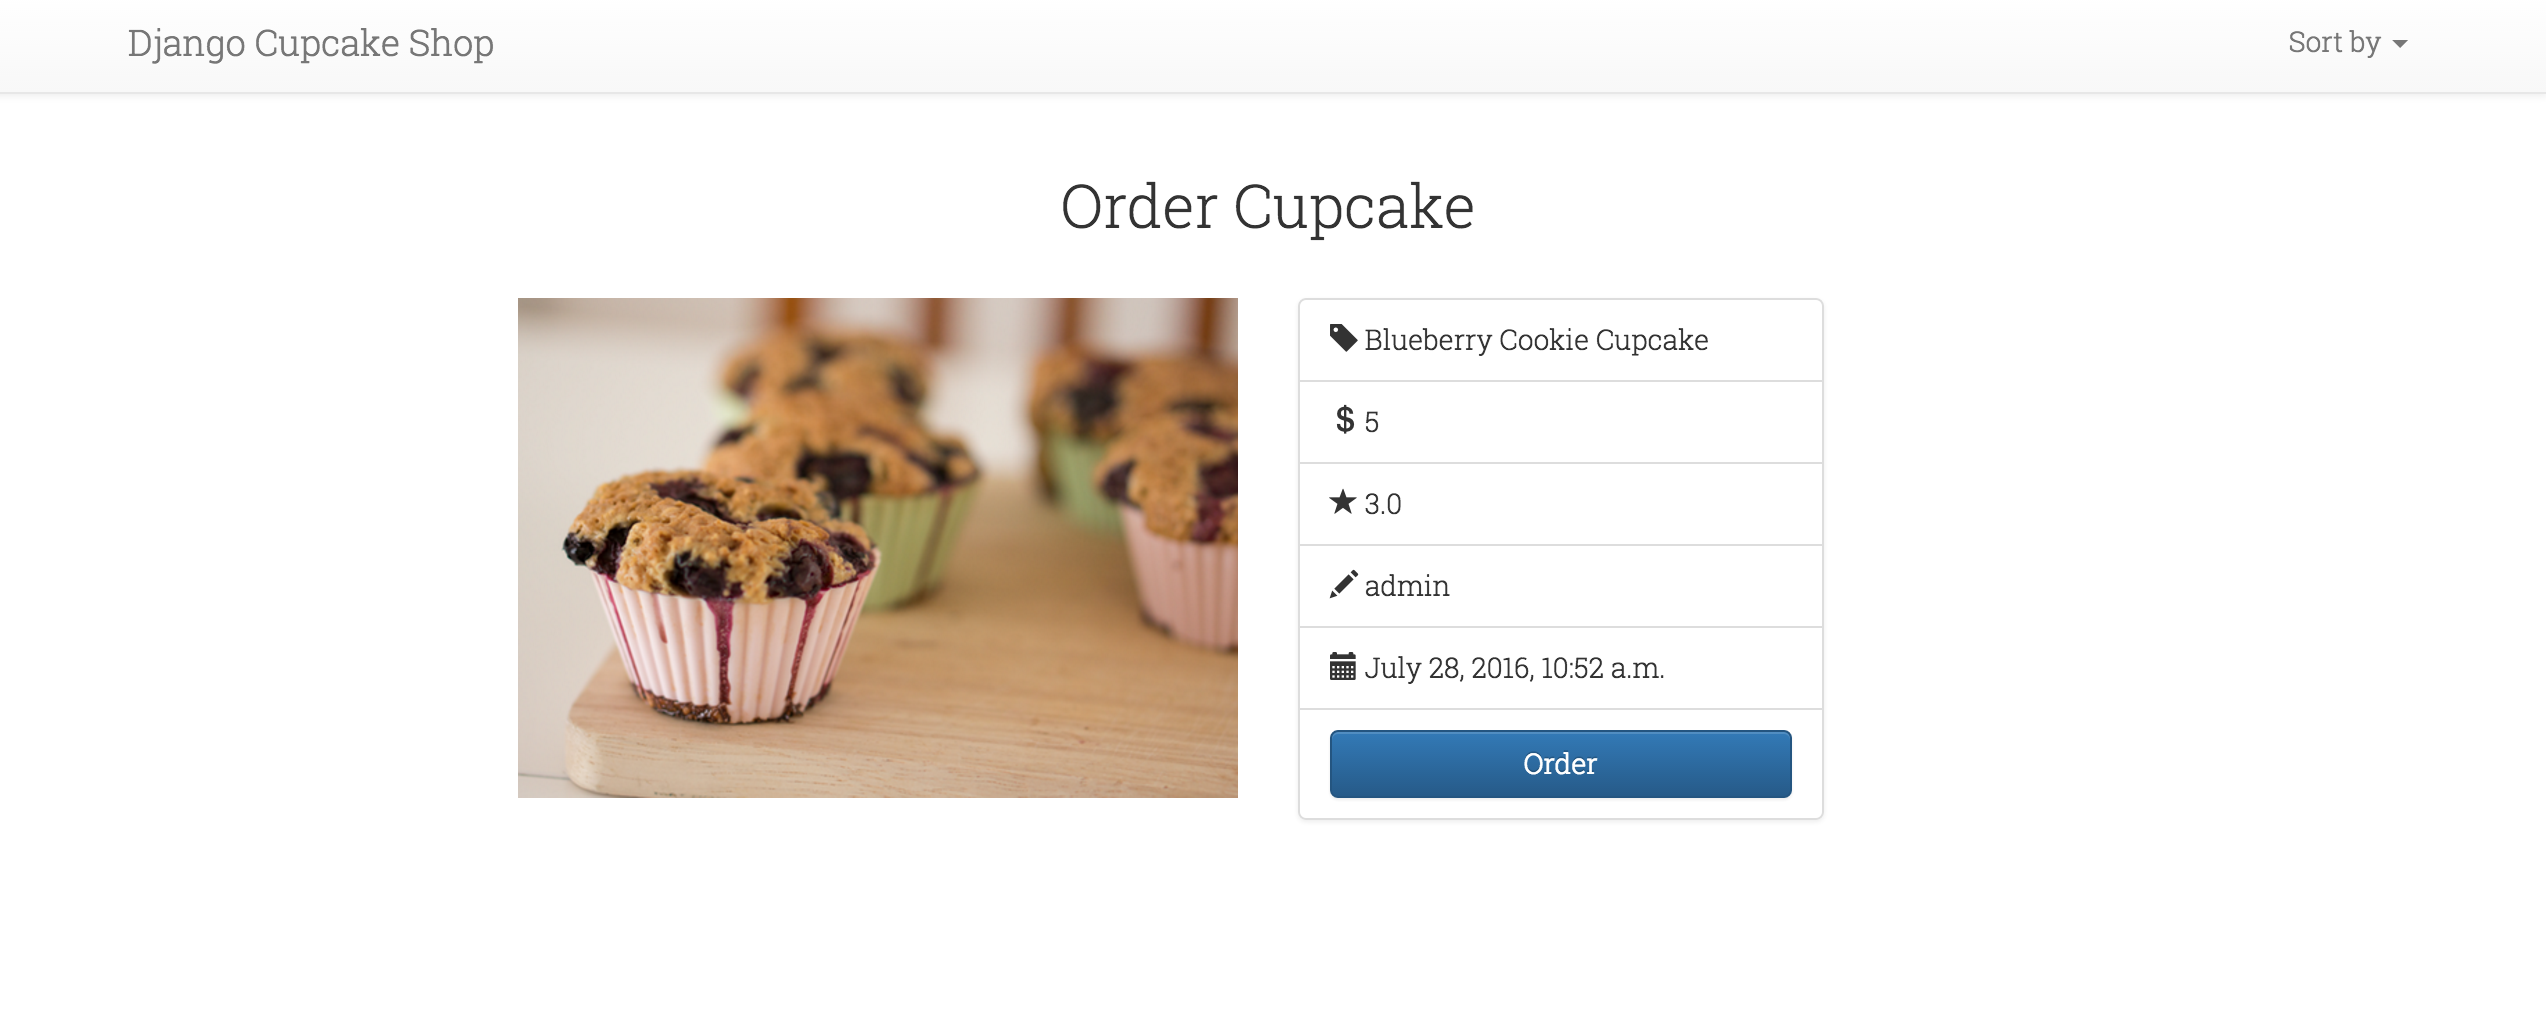
<h2 class="text-center">Order Cupcake</h2>
<div class="row">
<div class="col-xs-12 col-sm-6 col-md-4 col-lg-4 col-md-offset-2 col-md-lg-2">
<div class="card">
<div class="card-img-top">
<div class="image" style="background-image: url({{ cake.image.url }});"></div>
</div>
</div>
</div>
<div class="col-xs-12 col-sm-6 col-md-3 col-lg-3">
<div class="card">
<ul class="list-group">
<li class="list-group-item"><span class="glyphicon glyphicon-tag"></span> <strong>Chocolate Cupcake</strong></li>
<li class="list-group-item"><span class="glyphicon glyphicon-usd"></span> 3.00</li>
<li class="list-group-item"><span class="glyphicon glyphicon-pencil"></span> John</li>
<li class="list-group-item"><span class="glyphicon glyphicon-calendar"></span> 3rd June, 2015</li>
<li class="list-group-item">
{% for i in cake.rating|get_range %}
<span class="glyphicon glyphicon-star" aria-hidden="true"></span>
{% endfor %}
</li>
<li class="list-group-item">
<button type="button" class="btn btn-primary" data-toggle="modal" data-target="#myModal">
Order
</button>
</li>
</ul>
</div>
</div>
</div>
{% else %}
<h2 class="text-center">No Cupcake found :(</h2>
{% endif %}
</div>
<!-- Modal -->
<div class="modal fade" id="myModal" tabindex="-1" role="dialog" aria-labelledby="myModalLabel">
<div class="modal-dialog" role="document">
<div class="modal-content">
<div class="modal-header">
<button type="button" class="close" data-dismiss="modal" aria-label="Close"><span aria-hidden="true">×</span></button>
<h4 class="modal-title" id="myModalLabel">{{ cake.name }}</h4>
</div>
<div class="modal-body">
<p>Order completed 주문 완료됬었습니다!</p>
<p>{% now "jS F Y H:i" %}</p>
<p>Price : {{ cake.price }}</p>
</div>
<div class="modal-footer">
<button type="button" class="btn btn-default" data-dismiss="modal">Close</button>
</div>
</div>
</div>
</div>
{% endblock %}
Start development server again, and click on view button in home page to see detail page. Here is one example below
Step 11 Django Forms
Relevant branch
forms
The final thing we want to do on our website is create a nice way to add cupcakes by registered users. Django's admin is cool, but it is rather hard to customize and make pretty. With forms we will have absolute power over our interface - we can do almost anything we can imagine!
a. Create a new file forms.py in menu directory. We are going to use ModelForm which allows us to create a form from already created model. Add following code to your forms.py
from django import forms
from .models import Cupcake


class CupcakeForm(forms.ModelForm):

    class Meta:
        model = Cupcake
        fields = ('name','rating','price','image')
Note that we have excluded couple of fields like
createdAtandwriter. Actually we can set them up while saving the form. We will get back it shortly.
Let's add a new url for our form in menu/urls.py. Add below code after url(r'^cupcake/(?P<pk>\d+)/$',views.cupcake_detail,name="cupcake_detail"),
url(r'^cupcake/new/$', views.cupcake_new, name='cupcake_new'),
b. Now we have the form and added it to the url. All we need to do is to create a template and add function in view. Start by adding a + navigation button to your base.html template. Add following code just before <li class="dropdown">.
    {% if user.is_authenticated %}
      <li><a href="{% url 'menu:cupcake_new' %}"><span class="glyphicon glyphicon-plus"></span></a></li>
     {% endif %}
This
user.is_authenticatedwill cause the link to only be sent to the browser if the user requesting the page is logged in. This doesn't protect the creation of new posts completely, but it's a good first step.
Create a new html file cupcake_new.html in menu/templates/menu directory. Add following content to it.
cupcake_new.html
{% extends 'menu/base.html' %}
{% load staticfiles %}
{% block content %}
<div class="container">
<!-- Main component for a primary marketing message or call to action -->
<div class="jumbotron title text-center" style="height: 200px;">
<h1 style="color:black;">Add new Cupcake!</h1>
</div>
</div> <!-- /container -->
<div class="container">
<div class="row">
<div class="col-xs-12 col-sm-12 col-md-offset-2 col-lg-offset-3 col-md-4 col-lg-4">
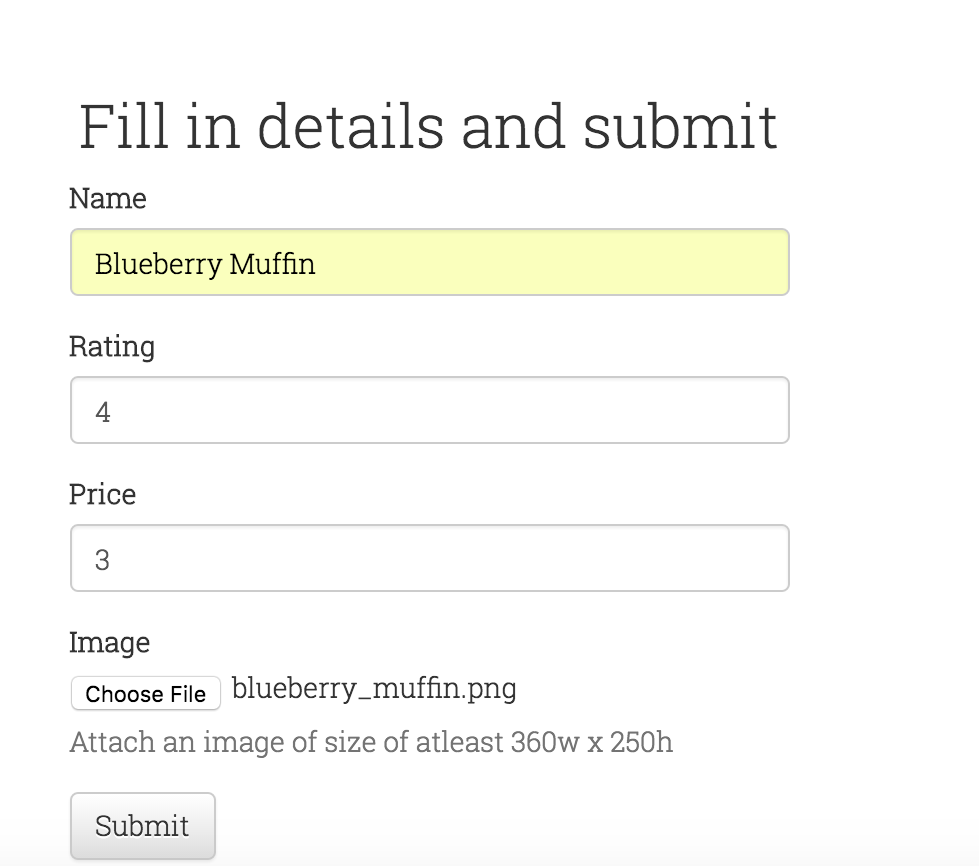
<h2 class="text-center">Fill in details and submit</h2>
<form method="POST" class="post-form" enctype="multipart/form-data">{% csrf_token %}
{{ form.non_field_errors }}
<div class="form-group">
<label for="{{ form.name.id_for_label }}">Name</label>
<input type="text" class="form-control" id="{{ form.name.id_for_label }}" name="{{ form.name.html_name }}" placeholder="blueberry Cupcake etc.">
{{ form.name.errors }}
</div>
<div class="form-group">
<label for="{{ form.rating.id_for_label }}">Rating</label>
<input type="text" class="form-control" id="{ form.rating.id_for_label }}" name="{{ form.rating.html_name }}" placeholder="1-5">
{{ form.rating.errors }}
</div>
<div class="form-group">
<label for="{{ form.price.id_for_label }}">Price</label>
<input type="text" class="form-control" id="{{ form.price.id_for_label }}" name="{{ form.price.html_name }}" placeholder="$ 2.00">
{{ form.price.errors }}
</div>
<div class="form-group">
<label for="{{ form.image.id_for_label }}">Image</label>
<input type="file" id="{{ form.image.id_for_label }}" name="{{ form.image.html_name }}">
<p class="help-block">Attach an image of size of atleast 360w x 250h</p>
{{ form.image.errors }}
</div>
<button type="submit" class="btn btn-default">Submit</button>
</form>
</div>
</div>
</div>
{% endblock %}
There is a simple way to add form in template too. Just add {{ form.as_p }} in between <form></form>. However, we can also add manually (as above template) if we like.
c. If you try to start development server, it will give an error. That's because we haven't added a view yet. Open menu/views.py file and add following lines with rest of the from rows.
from django.shortcuts import redirect
from .forms import CupcakeForm
from django.utils import timezone
from django.contrib.auth.decorators import login_required
and view function.
@login_required
def cupcake_new(request):
    if request.method == "POST":
        form = CupcakeForm(request.POST,request.FILES)
        if form.is_valid():
            cake = form.save(commit=False)
            cake.createdAt = timezone.now()
            cake.writer = request.user
            cake.save()
            return redirect('menu:cupcake_detail',pk=cake.pk)
    else:
        form = CupcakeForm()
    context = {'form':form}
    return render(request,"menu/cupcake_new.html",context)
@login_requiredwill make sure that only logged in user can save the new cupcake.
Let's see if it works. Go to the page http://127.0.0.1:8000/cupcake/new/, add name,rating, price and image, submit it... and voilà! The new cupcake is added and we are redirected to cupcake_detail page!
Congrats :) We are almost done with development of our site!
Finally, it's time to have cupcake. There is one more thing that we have to do. So hang in there...
Step 12 Deploy your site on PythonAnywhere
Relevant branch
deploy
Good work, if you have reached this far! Before deploying our site on PythonAnywhere. We have to commit all the changes and push them to Github.
Make sure that your .gitignore file has following content.
*.pyc
__pycache__
myvenv
db.sqlite3
/static
.DS_Store
media/
Security for Production
Follow this link
Django secret key
Open your settings.py file. You will find secret key
# SECURITY WARNING: keep the secret key used in production secret!
SECRET_KEY = '(+73cf=j*8!=r$#2à^@ibgpw8yn9pm#wa42bk&v(@*%m7nx1sg'
We are hosting our website on Github. So everyone can see the secret key. One way to avoid this is by making two separate settings.py file for development and production server. But it will really be a pain to maintain both.
We will use Environment Variables on PythonAnywhere to store our database password and SECRET_KEY. Before doing this, we have to change our settings.py file to replace secret_key with some dummy value. We will also make sure that DEBUG=False for production version. Replace the DEBUG=True, SECRET_KEY and ALLOWED_HOSTS code with following.
DEBUG = os.getenv('DJANGO_DEBUG') != 'FALSE'

# SECURITY WARNING: keep the secret key used in production secret!
if DEBUG:
    SECRET_KEY = 'Hell@World!'
else:
    SECRET_KEY = os.getenv('SECRET_KEY')

# SECURITY WARNING: don't run with debug turned on in production!

if DEBUG:
    ALLOWED_HOSTS = ['*']
else:
    ALLOWED_HOSTS = ['djangocupcakeshop.pythonanywhere.com']
os.getenv('DJANGO_DEBUG') is an environment variable which we will add on PythonAnywhere later.
We are making sure that our secret key is not Github! We are also making
DEBUG=Falsefor your production site.PythonAnywhere related code is in the next section.
Publish on Github
Do git status to check the current status. We will add all the files and save our changes
$ git add --all
$ git commit -m "finished tutorial until Step 10"
It's time to publish your awesome work to Github.
$ git push -u origin master
PythonAnywhere
PythonAnywhere has free tier which can you use to deploy your site. Go to PythonAnywhere.com and log in.
If you haven't signed up then sign up for a free "Beginner" account on PythonAnywhere.
When you've logged in to PythonAnywhere, you'll be taken to your dashboard or "Consoles" page. Choose the option to start a "Bash" console -- that's the PythonAnywhere version of a console, just like the one on your computer.
We will fetch our code from Github to Pythonanywhere using git clone.
$ git clone https://github.com/<your_github_user_name>/djangocupcakeshop.git
Don't forget to replace
<your_github_user_name>with your github username. Make sure that you are not usingDjangoGirlsSeoulusername :)
Now its time to setup virtual environment on PythonAnywhere.
$ cd djangocupcakeshop
$ virtualenv --python=python3.5 myvenv
$ source myvenv/bin/activate
(myvenv) $ pip install -r requirements.txt
One things to note that we put db.sqlite3 file in .gitignore. The main reason of it was to avoid sharing our database on github. We have to create a new database on PythonAnywhere and setup a superuser.
(myvenv) $ python manage.py migrate
(myvenv) $ python manage.py createsuperuser
Since we are deplpoying production version of our site, we have to do one more step. Run the following command in console
(myvenv) $ python manage.py collectstatic
Type yes when prompted. Django will move all static files (images,css, javascript) to a single directory (the STATIC_ROOT).
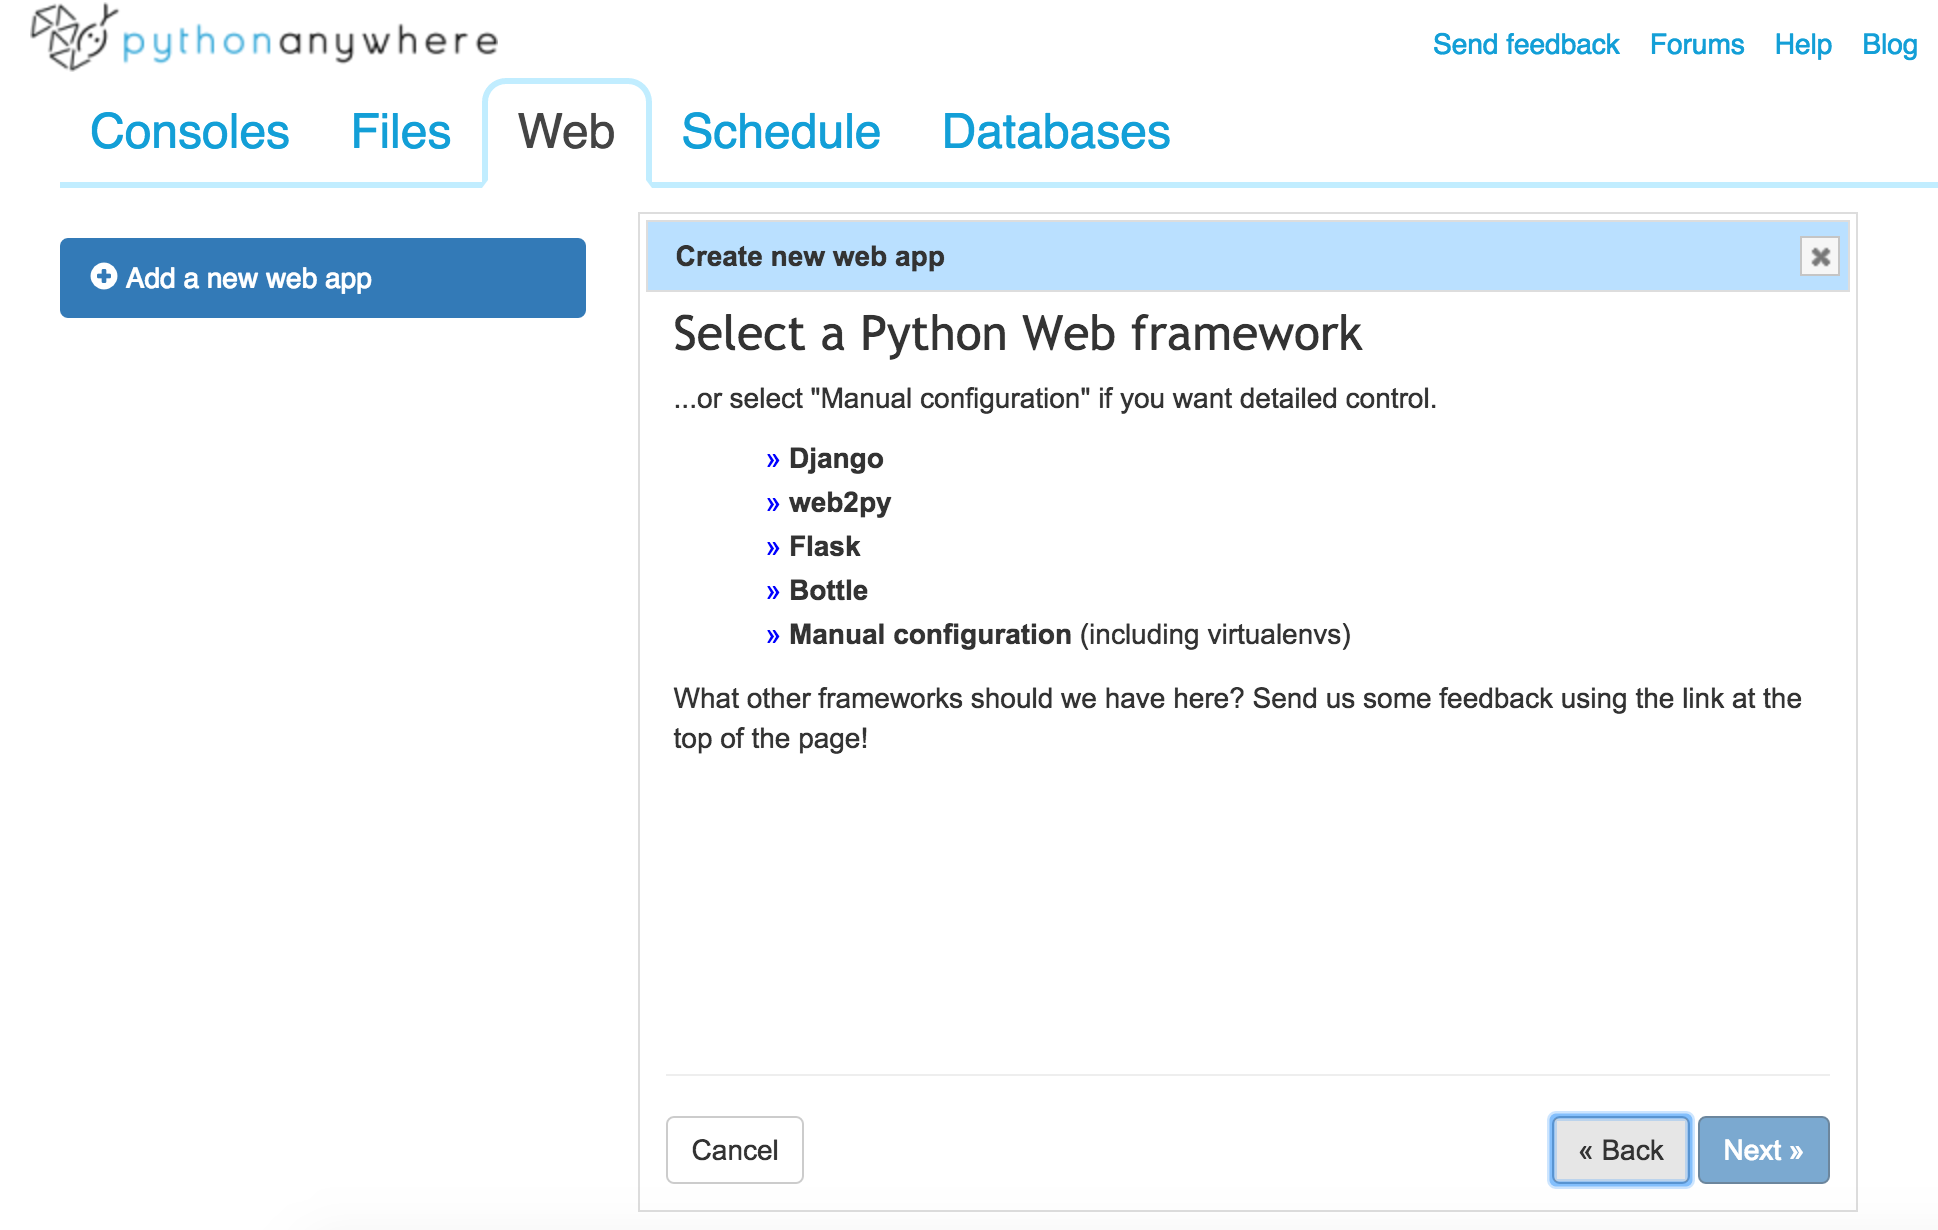
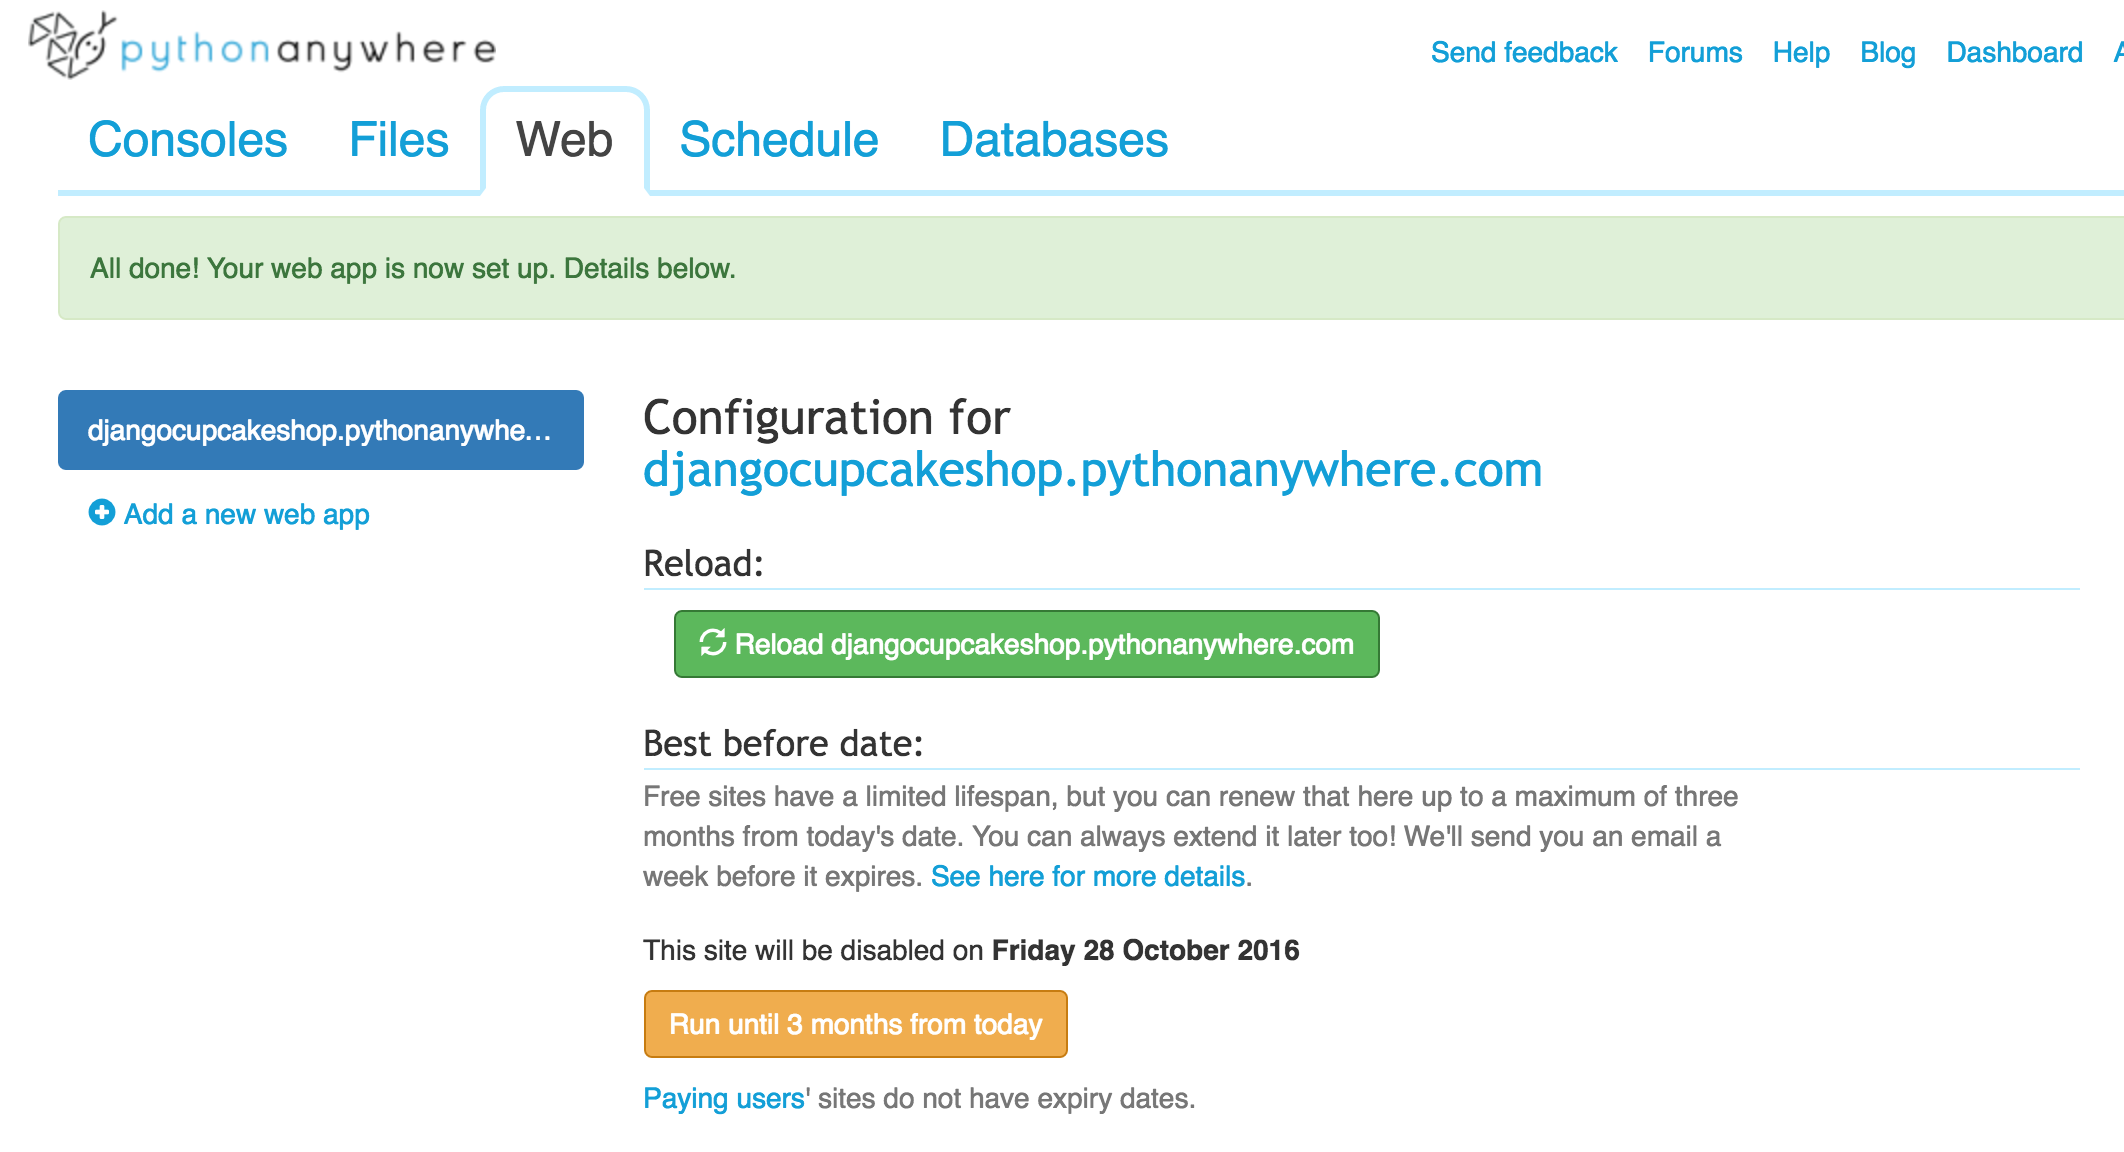
That's all for the console commands -:) Click back to the PythonAnywhere dashboard by clicking on its logo, and go click on the Web tab. Finally, hit Add a new web app.
After confirming your domain name, choose manual configuration (not the "Django" option) in the dialog. Next choose Python 3.5, and click Next to finish the wizard.
Setting the virtualenv
In the "Virtualenv" section, click the red text that says "Enter the path to a virtualenv", and enter: /home/<your-PythonAnywhere-username>/djangocupcakeshop/myvenv/. Click the blue box with the check mark to save the path before moving on.
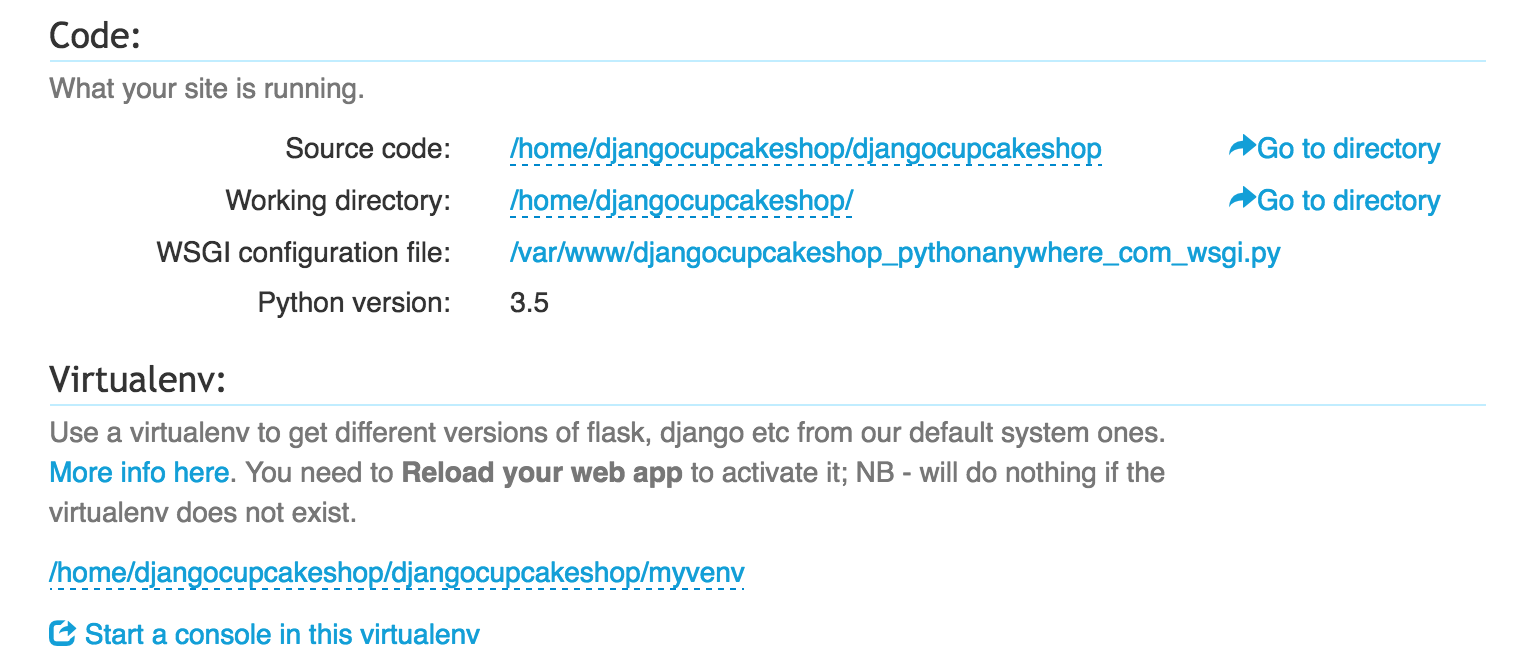
Also Add the path to your source code /home/<your-PythonAnywhere-username>/djangocupcakeshop.
Configuring the WSGI file
Click on wsgi configuration file link and paste the following contents. Replace path with your project path.
wsgi
import os
import sys

path = '/home/<your_pythonanywhere_username>/djangocupcakeshop'  # use your own PythonAnywhere username here
if path not in sys.path:
    sys.path.append(path)

os.environ['DJANGO_SETTINGS_MODULE'] = 'djangocupcakeshop.settings'
os.environ['DEBUG'] = 'FALSE'
os.environ['SECRET_KEY'] = 'MY_SECRET_KEY'

from django.core.wsgi import get_wsgi_application
from django.contrib.staticfiles.handlers import StaticFilesHandler
application = StaticFilesHandler(get_wsgi_application())
Replace
MY_SECRET_KEYwith your secret key!
We're all done! Hit the big green Reload button and you'll be able to go view your application. You'll find a link to it at the top of the page.
Step 13 Homework
a. Sort cupcakes by highest and lowest price
Hint : Make a url like
cupcakes/price/hightolow, add a corresponding view function. Get the data from Database, convert pricestringto int and sort using python. You can use the same templatelist.htmlfor this homework.
b. Sort cupcakes by highest rating
Remarks
If you have reached this far! Well done and Congrats :) You can move to Advance part, if you have enough left-over time :)