Advance
This tutorial covers Django Auth, Django Model Relations, Continuous Integration (CI) and coverage test, MySQL DB and custom admin
1. Login and Register
Login and signup are an essential part of websites nowadays. Django comes with a default user authentication system. You can also extend and customize it! We are going to add signup and login page to our website.
For this purpose we create a new app accounts.
$ python manage.py startapp accounts
and keep all the logic related to login and signup there. Add the app accounts in INSTALLED_APPS (settings.py)
We will start implementing the login functionality as we have created a superuser already so we can test it right away.
Add following url to point all the auth related links to accounts.url
djangocupcakeshop/urls.py
url(r'^accounts/', include('accounts.urls', namespace="accounts")),
Create a file urls.py in accounts directory. Add the following code to it.
from django.conf.urls import include, url
from . import views

urlpatterns = [
    url('^', include('django.contrib.auth.urls')),
]
This will include the following URL patterns:
^login/$ [name='login']
^logout/$ [name='logout']
^password_change/$ [name='password_change']
^password_change/done/$ [name='password_change_done']
^password_reset/$ [name='password_reset']
^password_reset/done/$ [name='password_reset_done']
^reset/(?P<uidb64>[0-9A-Za-z_\-]+)/(?P<token>[0-9A-Za-z]{1,13}-[0-9A-Za-z]{1,20})/$ [name='password_reset_confirm']
^reset/done/$ [name='password_reset_complete']
For our tutorial, we are going to use login,logout and create a registration page.
The default login url should have a template registration/login.html. So we create a new directory registration in accounts directory. In the registration directory create a login.html file with the following contents.
{% extends 'menu/base.html' %}
{% load staticfiles %}
{% block content %}
  <div class="container">
    <!-- Main component for a primary marketing message or call to action -->
    <div class="jumbotron title text-center" style="height: 150px;">
      <h3 style="color:black;">Welcome back!</h3>
    </div>

  </div> <!-- /container -->

  <div class="container">
    <div class="row">
      <div class="col-xs-12 col-sm-12 col-md-offset-4 col-lg-offset-4 col-md-6 col-lg-6">
        {% if form.errors %}
          <p style="color:red;">Your username and password didn't match. Please try again.</p>
        {% endif %}
        {% if next %}
          {% if user.is_authenticated %}
            <p>Your account doesn't have access to this page. To proceed,
              please login with an account that has access.</p>
          {% else %}
            <p style="color:red;">Please login to see this page.</p>
          {% endif %}
        {% endif %}
        <form class="form-horizontal" method="post" action="{% url 'accounts:login' %}">
          {% csrf_token %}
        <div class="form-group">
          <label for="{{ form.username.id_for_label }}" class="col-sm-2 col-md-2 col-lg-2 control-label">Username</label>
          <div class="col-sm-10 col-md-5 col-lg-5">
            <input type="text" class="form-control" id="{{ form.username.id_for_label }}" name="{{ form.username.html_name }}" placeholder="username">
          </div>
        </div>
        <div class="form-group">
          <label for="{{ form.password.id_for_label }}" class="col-sm-2 col-md-2 col-lg-2 control-label">Password</label>
          <div class="col-sm-10 col-md-5 col-lg-5">
            <input type="password" class="form-control" id="{{ form.password.id_for_label }}" name="{{ form.password.html_name }}" placeholder="Password">
          </div>
        </div>
        <input type="hidden" name="next" value="{{ next }}" />
        <div class="form-group">
          <div class="col-sm-offset-2 col-sm-10">
            <button type="submit" class="btn btn-default">Log in</button>
          </div>
        </div>
      </form>
    </div>
    </div>
  </div>
{% endblock %}
Start developement server and visit http://127.0.0.1/accounts/login . After logging in, you will encounter an error, because we haven't setup view and template for profile page. Let's create a profile.html page in registration directory
profile.html
{% extends 'menu/base.html' %}
{% load staticfiles %}
{% block content %}
  <div class="container">
    <div class="jumbotron title text-center" style="height: 150px;">
      <h3 style="color:black;">Hello {{ request.user.username }}!</h3>
    </div>
  </div>

  <div class="container">
    {% if cakes %}
    <h2 class="text-center">My Cupcakes!</h2>
    <div class="row">
      {% for cake in cakes %}
      <div class="col-sm-6 col-md-4">
        <div class="thumbnail" style="height:336px;">
          <a href="{% url 'cupcake_detail' pk=cake.pk %}"><img class="img-responsive" src="{{ cake.image.url }}" alt="{{ cake.name }}"></a>
          <div class="caption">
            <h3>{{ cake.name }}</h3>
          </div>
        </div>
      </div>
      {% endfor %}
    </div>
    {% else %}
    <h2 class="text-center">No Cupcakes added yet -:(</h2>
    {% endif %}
  </div>
{% endblock %}
As you can notice from the template, that it contains the cupcakes added by user. We have to add a view function for user profile. Go ahead and add the following code to accounts app's views.py file.
from django.shortcuts import render
from django.contrib.auth.decorators import login_required
from menu.models import Cupcake

@login_required
def user_profile(request):
    my_cakes = Cupcake.objects.filter(writer=request.user)
    context = {'cakes':my_cakes}
    return render(request,"registration/profile.html",context)
We haven't added login and signup links in our base.html template yet. After adding login and singup links, our base.html will look like following.
{% load staticfiles %}
<!DOCTYPE html>
<html lang="en">
<head>
  <meta charset="utf-8">
  <meta http-equiv="X-UA-Compatible" content="IE=edge">
  <meta name="viewport" content="width=device-width, initial-scale=1">
    <title>Django Cupcake Shop</title>

<link rel="stylesheet" href="https://maxcdn.bootstrapcdn.com/bootstrap/3.3.6/css/bootstrap.min.css">
<!-- Optional theme -->
<link rel="stylesheet" href="https://maxcdn.bootstrapcdn.com/bootstrap/3.3.6/css/bootstrap-theme.min.css">
<link rel="stylesheet" href="{% static 'menu/css/style.css' %}">
</head>
<body>
  <!-- Fixed navbar -->
  <nav class="navbar navbar-default navbar-fixed-top">
    <div class="container">
      <div class="navbar-header">
        <button type="button" class="navbar-toggle collapsed" data-toggle="collapse" data-target="#navbar" aria-expanded="false" aria-controls="navbar">
          <span class="sr-only">Toggle navigation</span>
          <span class="icon-bar"></span>
          <span class="icon-bar"></span>
          <span class="icon-bar"></span>
        </button>
        <a class="navbar-brand" href="/">Django Cupcake Shop</a>
      </div>
      <div id="navbar" class="navbar-collapse collapse">
        <ul class="nav navbar-nav navbar-right">
          {% if user.is_authenticated %}
          <li><p class="navbar-text">Welcome <a href="/accounts/profile">{{ user.username }}</a></p></li>
           <li><a href="{% url 'cupcake_new' %}"><span class="glyphicon glyphicon-plus"></span></a></li>
           <a href="{% url "accounts:logout" %}" class="btn btn-danger navbar-btn">Logout</a>
           {% else %}
           <a href="}" class="btn btn-primary navbar-btn">Register</a>
           <a href="{% url "accounts:login" %}" class="btn btn-default navbar-btn">Sign in</a>
           {% endif %}
          <li class="dropdown">
            <a href="#" class="dropdown-toggle" data-toggle="dropdown" role="button" aria-haspopup="true" aria-expanded="false">Sort by <span class="caret"></span></a>
            <ul class="dropdown-menu">
              <li><a href="#">Highest</a></li>
              <li><a href="#">Lowest</a></li>
            </ul>
          </li>
        </ul>
      </div><!--/.nav-collapse -->
    </div>
  </nav>

    {% block content %}
    {% endblock %}

  <footer class="footer">
      <div class="container">
        <p class="text-muted">Pycon 2016 Tutorial.</p>
      </div>
    </footer>
  <script src="https://ajax.googleapis.com/ajax/libs/jquery/1.11.3/jquery.min.js"></script>
  <script src="https://maxcdn.bootstrapcdn.com/bootstrap/3.3.6/js/bootstrap.min.js" ></script>
  <script>
  $(function () {
  $('[data-toggle="popover"]').popover()
  })
  </script>
</body>
</html>
Start development server and test login. Next step would be to add a register page. For this purpose we have to do a little more than what we did for login. Firstly of all, let's create a register template in the same folder with profile.html and login.html.
register.html
{% extends 'menu/base.html' %}
{% load staticfiles %}
{% block content %}
  <div class="container">
    <!-- Main component for a primary marketing message or call to action -->
    <div class="jumbotron title text-center" style="height: 150px;">
      <h3 style="color:black;">Cupcake and High Fives!</h3>
    </div>

  </div> <!-- /container -->

  <div class="container">
    <div class="row">
      <div class="col-xs-12 col-sm-12 col-md-offset-3 col-lg-offset-3 col-md-6 col-lg-6">
        {% if form.errors %}
          <p style="color:red;">Try again.</p>
        {% endif %}
        <form class="form-horizontal" method="post" action="{% url 'accounts:register' %}">
          {% csrf_token %}
        <div class="form-group">
          <label for="{{ form.username.id_for_label }}" class="col-sm-4 col-md-4 col-lg-4 control-label">Username</label>
          <div class="col-sm-10 col-md-5 col-lg-5">
            <input type="text" class="form-control" id="{{ form.username.id_for_label }}" name="{{ form.username.html_name }}" placeholder="username">
              {{ form.username.errors }}
          </div>
        </div>
        <div class="form-group">
          <label for="{{ form.password1.id_for_label }}" class="col-sm-4 col-md-4 col-lg-4 control-label">Password</label>
          <div class="col-sm-10 col-md-5 col-lg-5">
            <input type="password" class="form-control" id="{{ form.password1.id_for_label }}" name="{{ form.password1.html_name }}" placeholder="Password">
              {{ form.password1.errors }}
          </div>
        </div>
        <div class="form-group">
          <label for="{{ form.password2.id_for_label }}" class="col-sm-2 col-md-4 col-lg-4 control-label">Confirm Password</label>
          <div class="col-sm-10 col-md-5 col-lg-5">
            <input type="password" class="form-control" id="{{ form.password2.id_for_label }}" name="{{ form.password2.html_name }}" placeholder="Password">
              {{ form.password2.errors }}
          </div>
        </div>
        <input type="hidden" name="next" value="{{ next }}" />
        <div class="form-group">
          <div class="col-md-offset-4 col-lg-offset-4 col-sm-offset-2 col-sm-10">
            <button type="submit" class="btn btn-default">Register</button>
          </div>
        </div>
      </form>
    </div>
    </div>
  </div>
{% endblock %}
Add link to register page in base.html template
<a href="{% url "accounts:register" %}" class="btn btn-primary navbar-btn">Register</a>
Secondly, add a view function register to handle register get/post request.
accounts/views.py
Add the following import lines
from django.http import HttpResponseRedirect
from django.contrib.auth.forms import UserCreationForm
from django.contrib.auth import authenticate,login
followed by
def register(request):
    if request.user.is_authenticated():
        return HttpResponseRedirect('/accounts/profile')

    if request.method == 'POST':
        form = UserCreationForm(request.POST)
        if form.is_valid():
            new_user = form.save()
            print(new_user.username)
            username = request.POST['username']
            password = request.POST['password1']
            user = authenticate(username=username, password=password)
            if user is not None:
                login(request,user)
                return HttpResponseRedirect('/accounts/profile')
    else:
        form = UserCreationForm()
    return render(request, 'registration/register.html', { 'form': form })
Django provides a default
UserCreationFormwhich only includes username and password. If you want to add email, first and last name as required paramaters, then you should created a custom form.
Start development server and test login and register functions.
You might observe that logout link takes us to admin logout link. Let's override the default and take user to home page after logging out.
Add following code to accounts/urls.py
url('^logout/$',views.logout_view,name="logout"),
and corresponding view function to accounts/views.py
from django.contrib.auth import logout

def logout_view(request):
    logout(request)
    return HttpResponseRedirect('/')
Start development server and test logout feature.
Under ideal circumstances everything works! But we are still going to write tests for our login and register page :)
tests.py
from django.test import TestCase, Client
from django.contrib.auth.models import User

class LoginAndLogout(TestCase):
    def setUp(self):
        self.client = Client()
        u = User.objects.create_user('test_user', 'test@example.com', 'password1')
        u.save()

    def test_login_post(self):
        response = self.client.post("/accounts/login/", {"username": "test_user" ,"password": "password1", "next": "/"}, follow=True)
        self.assertRedirects(response, '/')
        self.assertContains(response, "test_user")

    def test_login_fail(self):
        response = self.client.post("/accounts/login/", {"username": "test_user1" ,"password": "password1", "next": "/"})
        self.assertContains(response, "Your username and password didn't match. Please try again.")

    def test_login_then_logout(self):
        login_response = self.client.post("/accounts/login/", {"username": "test_user" ,"password": "password1", "next": "/"}, follow=True)
        self.assertRedirects(login_response, '/')
        self.assertContains(login_response, "test_user")
        logout_response = self.client.get('/accounts/logout/', follow=True)
        self.assertRedirects(logout_response, '/')
        self.assertNotContains(logout_response, "test_user")

class Register(TestCase):
    def setUp(self):
        self.client = Client()

    def test_register_post(self):
        response = self.client.post("/accounts/register/", {"username": "test_user" ,"password1": "password1",  "password2": "password1"}, follow=True)
        self.assertContains(response, "test_user")
        self.assertEqual(User.objects.get(username="test_user").username, "test_user")
You can check tests locally by executing
$ python manage.py test accounts
2. Comments
If you are wondering how delicious or awesome our Cupcake is ? We have to allow registereted users to express about it via comments.
Create Comment model
A simple comment would have an associated user and cupcake. We are also going to moderate comments and let admin approve it :)
Create a comment model class in menu/models.py file.
class Comment(models.Model):
    post = models.ForeignKey(Cupcake, related_name='comments')
    writer = models.ForeignKey(User)
    text = models.TextField()
    created_date = models.DateTimeField(default=timezone.now)
    approved_comment = models.BooleanField(default=False)

    def approve(self):
        self.approved_comment = True
        self.save()

    def __str__(self):
        return self.text
For creating the tables in database, execute following two commands.
$ python manage.py makemigrations menu

$ $ python manage.py migrate menu
Register Comment model in Admin
Open menu/admin.py and import Comment model class
from .models import Cupcake, Comment
and register the comment model by adding the following line.
admin.site.register(Comment)
Let users write comments
Let's add a form for users to write comments. We have created a Comment model already. Now we are going to create a CommentForm. open forms.py and add following code.
import Comment
class CommentForm(forms.ModelForm):

    class Meta:
        model = Comment
        fields = ('text',)
Add following to menu/templates/menu/detail.html just above the endblock.
  <div class="row">
      <div class="col-xs-12 col-sm-6 col-md-7 col-lg-7 col-md-offset-3 col-lg-offset-2">
        <h3>Comments ({{ cake.comments.count }})</h3>
        <p></p>
        {% if user.is_authenticated %}
        <form method="POST">{% csrf_token %}
          <!-- {{ form.as_p }} -->
          <div class="form-group">
            <input type="text" name="{{ form.text.html_name }}" class="form-control" placeholder="Write comment">
          </div>
          <button type="submit" class="btn btn-default">Submit</button>
        </form>
        {% else %}
          <p><a href="{% url 'accounts:login' %}">Login</a> to post comment</p>
        {% endif %}

        {% for comment in cake.comments.all %}
          {% if comment.approved_comment %}
          <div class="media">
            <div class="media-left">
              <a href="#">
                <img class="media-object" src="{% static 'menu/images/avatar.png' %}" alt="">
              </a>
            </div>
            <div class="media-body">
              <h4 class="media-heading">{{ comment.writer }}</h4>
              <p>{{ comment.text|linebreaks }}</p>
              <i>{{ comment.created_date }}</i>
            </div>
          </div>
          {% endif %}
        {% empty %}
          <p>No comments here yet :(</p>
        {% endfor %}
      </div>
    </div>
    {% else %}
    <h2 class="text-center">No Cupcake found :(</h2>
    {% endif %}
  </div>
Modify the view function cupcake_detail in menu/views.py to include the CommentForm. After modifying your code should like the following.
from .forms import CommentForm


def cupcake_detail(request,pk):
    cake = get_object_or_404(Cupcake,pk=pk)
    if request.method == "POST":
        form = CommentForm(request.POST)
        if form.is_valid():
            comment = form.save(commit=False)
            comment.post = cake
            comment.writer = request.user
            comment.approved_comment = True
            comment.save()
            return redirect('menu.views.cupcake_detail', pk=cake.pk)
    else:
        form = CommentForm()
    context = {"cake": cake, "form":form}
    return render(request,"menu/detail.html",context)
For demo purposes we are marking all comments as approved.
Start development server, view any cupcake and try the comment feature :)

Tip : After you deploy your site on PythonAnywhere or Azure again with Comment feature. You have to execute migrate command!
3. Travis CI and Coveralls
Running tests before every commit and merge can be little tedious.
Thankfully, Continuous Integration can save the day. Continuous Integration, often abbreviated to just CI, is the process of automatically building and running tests whenever a change is committed.
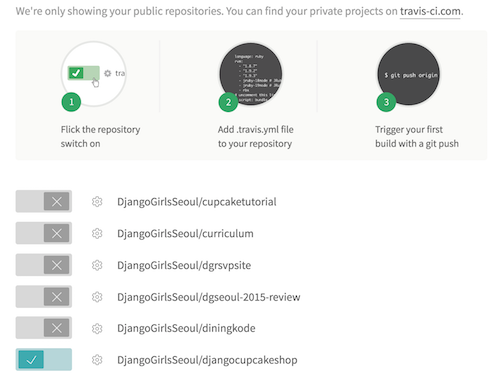
We are going to use Travis-CI which is free for open-source projects. Signup for free account on https://travis-ci.org using your Github account. Sync your github repos and enable TRAVIS-CI for project.
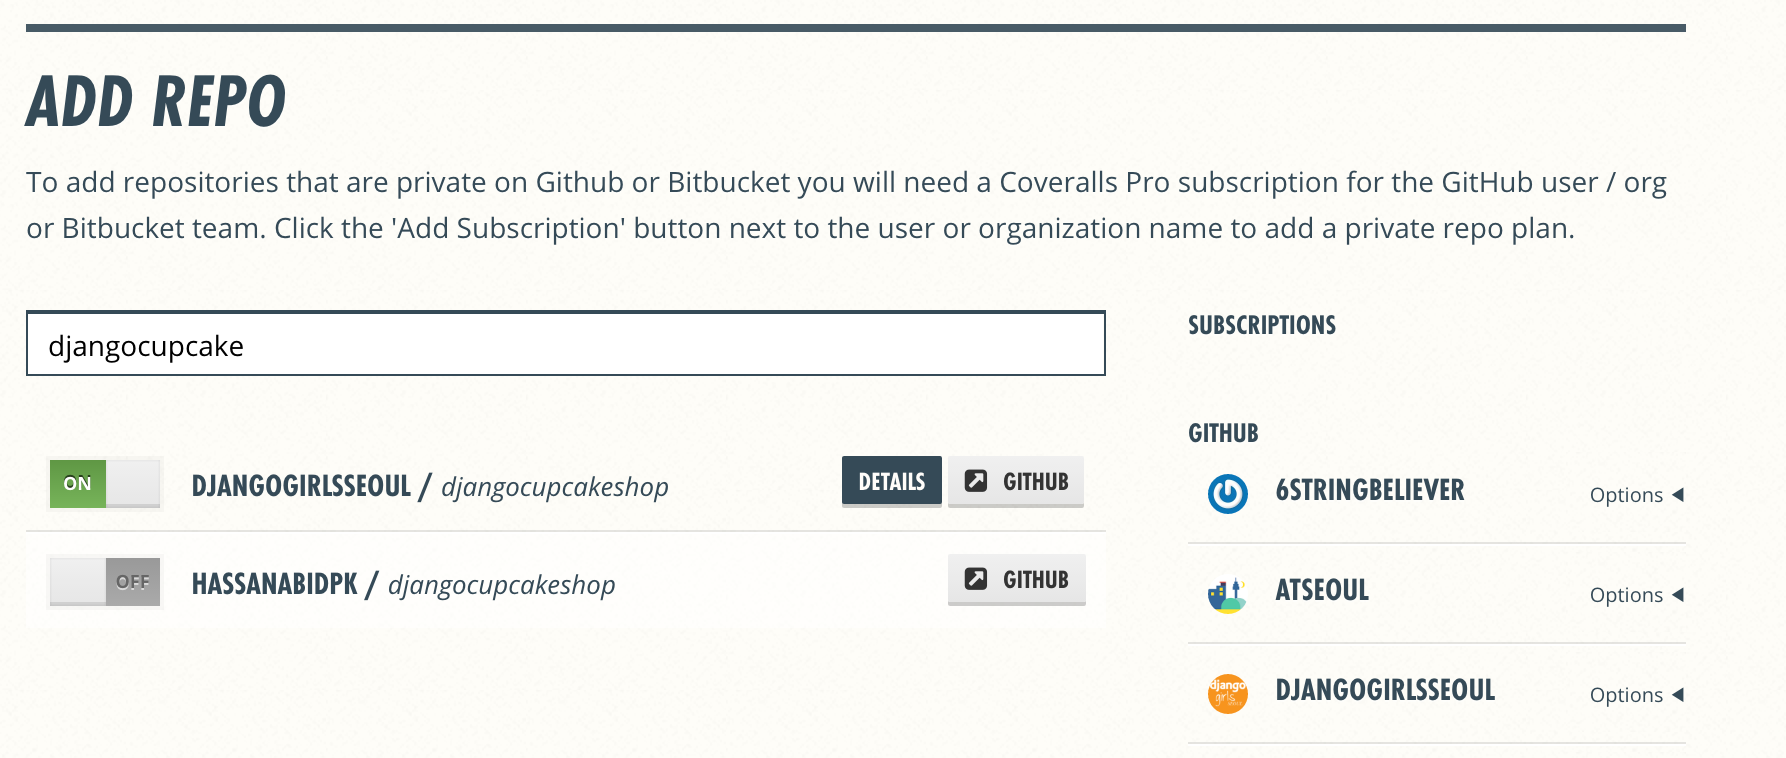
Create a file .travis.yml in project root directory. Before adding any contents to file. let's complete the signup process for https://coveralls.io. Once you signedup successfully, you can add Github repo.
Coveralls is a web service to help you track your code coverage over time, and ensure that all your new code is fully covered.
Add following contents to your .travis.yml file.
language: python
python:
  - '3.5'
branches:
  only:
    - 'advance'
    - 'rest-api'
install:
  - pip install -r requirements.txt
  - pip install coveralls
script:
  - python manage.py test
  - coverage run --source=djangocupcakeshop,menu,accounts manage.py test
notifications:
  email: false
after_success:
  coveralls
Make sure to add/change branches field. In our case, we are adding advance and rest-api branches only.
Let's add nice badges for showing status of build and coverage in our README. Add markup from Travis and Coveralls to your project's RADME.md. Here is one sample

![]()
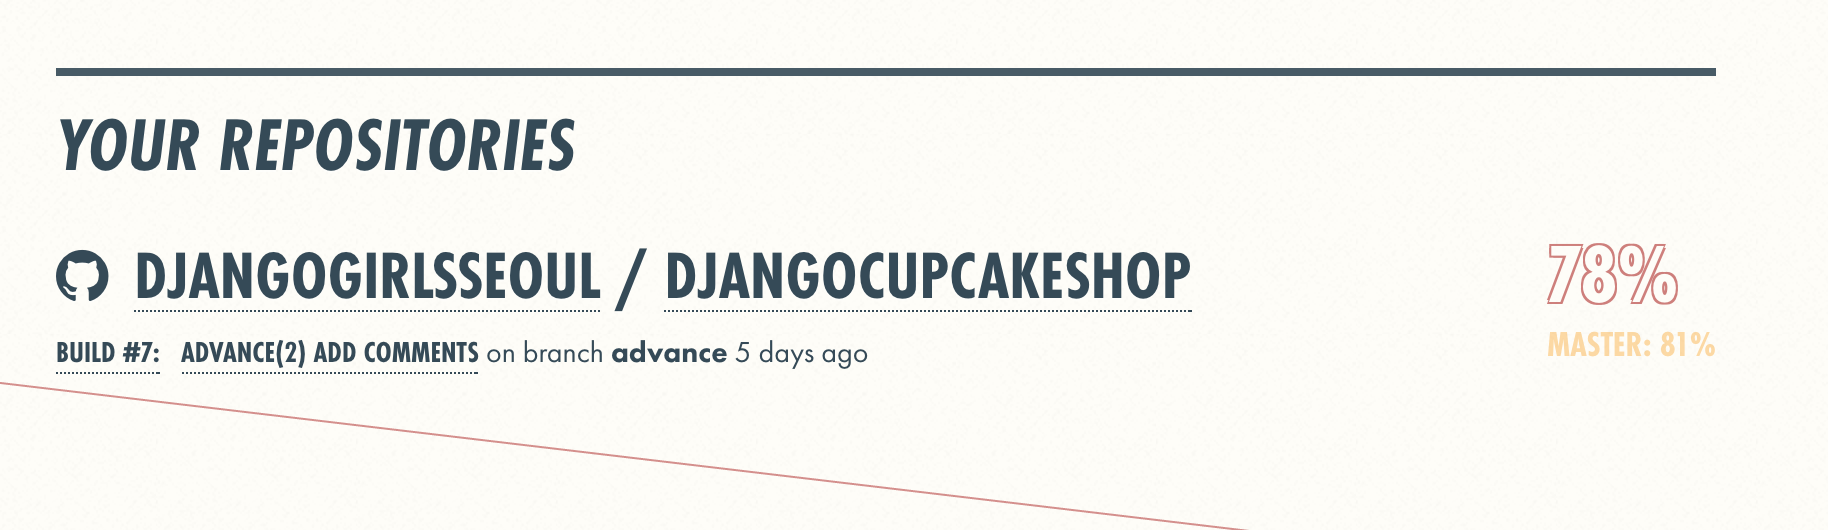
Now commit your changes and push to Github. It will automatically initiate a travis-cui build and coverage test. You can find similar reports as below

4. Change database to MySQL
You can use other databases like Postgres or MySQL, below is the settings for MySQL.
DATABASES = {
    'default': {
        'ENGINE': 'django.db.backends.mysql',
        'NAME': 'mydatabase',
        'USER': 'mydatabaseuser',
        'PASSWORD': 'mypassword',
        'HOST': '127.0.0.1',
        'PORT': '5432',
    }
}

`
You have to install mysqlclient to use it.
5. Custom Admin
You can cusotmize the Django admin. Refer to official tutorial guide for some examples.